poniedziałek, 20 lutego 2017

How to install Bitbucket on Debian

~$ wget https://www.atlassian.com/software/stash/downloads/binary/atlassian-bitbucket-4.13.0-x64.bin


~$ chmod +x atlassian-bitbucket-4.13.0-x64.bin

~$ sudo apt-get install git

~$  sudo ./atlassian-bitbucket-4.13.0-x64.bin
Unpacking JRE ...
Starting Installer ...

This will install Bitbucket 4.13.0 on your computer.
OK [o, Enter], Cancel [c]

Please choose one of the following:
Install a new instance [1, Enter], Upgrade an existing instance [2]
1
Install a new Bitbucket, Data Center or mirror instance.
Upgrade an existing Bitbucket, Data Center or mirror instance.
Install Bitbucket 4.13.0
Please choose one of the following:
Install a standard instance [1, Enter], Install a Data Center instance [2], Install a mirror instance [3]

Where should Bitbucket be installed?

[/opt/atlassian/bitbucket/4.13.0]

Default location for Bitbucket home directory

The location for Bitbucket data.
This will be the default location for repositories, plugins, and other data.

Ensure that this location is not used by another Bitbucket installation.
[/var/atlassian/application-data/bitbucket]

Configure which ports Bitbucket will use.


Bitbucket requires two TCP ports that aren't being used by other
applications.

The HTTP port is where users access Bitbucket through their browsers. The
control port is used to start and stop Bitbucket.

Bitbucket also requires ports 7992 and 7993 are available to run an embedded
Elasticsearch instance that provides search functionality to Bitbucket.
HTTP Port Number
[7990]

Control Port Number
[8006]


For a production server we recommend that you run Bitbucket as a
Windows/Linux service because Bitbucket will restart automatically when the
computer restarts.
Install Bitbucket as a service?
Yes [y, Enter], No [n]

Please review your Bitbucket installation settings


Installation Directory: /opt/atlassian/bitbucket/4.13.0
Home Directory: /var/atlassian/application-data/bitbucket
HTTP Port: 7990
Control Port: 8006
Install as a service: Yes

Install [i, Enter], Exit [e]


Extracting files ...

Installation of Bitbucket is complete
Would you like to launch Bitbucket?
Yes [y, Enter], No [n]
y

Please wait a few moments while Bitbucket starts up.

Launching Bitbucket ...
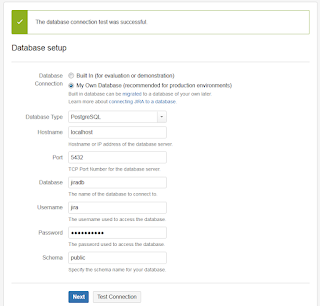
How to set up PostreSQL database for Bitbucket on Debian

Install PostreSQL if you haven't already

~$ sudo apt-get update
~$ sudo apt-get install postgresql postgresql-client

Create database user 'jira'

~$ sudo su - postgres
~$ createuser -P bitbucket
Enter password for new role:
Enter it again:
~$ exit
~$ sudo -u postgres psql -c 'alter user bitbucket with createdb' postgres

Create database 'bitbucketdb'

~$ sudo su - bitbucket
~$ createdb -E UNICODE -l C -T template0 bitbucketdb
~$ exit

No go to Bitbucket set up by web browser and continue installation

piątek, 17 lutego 2017

How to prepare PostgreSQL for Jira on Debian

Install PostreSQL if you haven't already

~$ sudo apt-get update
~$ sudo apt-get install postgresql postgresql-client

Create database user 'jira'

~$ sudo su - postgres
~$ createuser -P jira
Enter password for new role:
Enter it again:
~$ sudo -u postgres psql -c 'alter user jira with createdb' postgres

Create database 'jiradb'

~$ sudo su - jira
$ createdb -E UNICODE -l C -T template0 jiradb
$ exit

No go to jira set up by web browser, pick advanced configuration and set up the database as below.


How to install Jira on Debian

3 steps to install Jira on Debian


~$ wget https://www.atlassian.com/software/jira/downloads/binary/atlassian-jira-software-7.3.1-x64.bin


~$ chmod a+x atlassian-jira-software-7.3.1-x64.bin

~$ sudo ./atlassian-jira-software-7.3.1-x64.bin
This will install JIRA Software 7.3.1 on your computer.
OK [o, Enter], Cancel [c]

Choose the appropriate installation or upgrade option.
Please choose one of the following:
Express Install (use default settings) [1], Custom Install (recommended for advanced users) [2, Enter], Upgrade an existing JIRA installation [3]

Details on where JIRA Software will be installed and the settings that will be used.
Installation Directory: /opt/atlassian/jira
Home Directory: /var/atlassian/application-data/jira
HTTP Port: 8080
RMI Port: 8005
Install as service: Yes
Install [i, Enter], Exit [e]

Extracting files ...


Please wait a few moments while JIRA Software is configured.
Installation of JIRA Software 7.3.1 is complete
Start JIRA Software 7.3.1 now?
Yes [y, Enter], No [n]


Please wait a few moments while JIRA Software starts up.
Launching JIRA Software ...
Installation of JIRA Software 7.3.1 is complete
Your installation of JIRA Software 7.3.1 is now ready and can be accessed
via your browser.
JIRA Software 7.3.1 can be accessed at http://localhost:8080
Finishing installation ...

czwartek, 9 lutego 2017

Resize vagrant disk storage (hard drive) with Virtual Box provider and Windows guest.

Before you start whole process of resizing disk storage you have to stop your VM.

Also you need to know your VM name.

It can be checked with:

VBoxManage list vms
"YOUR_VM_NAME" {385e587a-ad47-4d36-a734-a126b9e04590}

Usually vagrant boxes comes with VMDK type storage which cannot be resized.
You need to convert the format to resizeable VDI:

VBoxManage  clonehd "/root/VirtualBox VMs/YOUR_VM_NAME/packer-virtualbox-iso-1459796137-disk1.vmdk" "/root/VirtualBox VMs/YOUR_VM_NAME/packer-virtualbox-iso-1459796137-disk1.vdi" --format vdi
0%...10%...20%...30%...40%...50%...60%...70%...80%...90%...100% Clone medium created in format 'vdi'. UUID: 67985552-a3e5-4fad-aedd-82565ac963d4
 packer-virtualbox-iso-1459796137-disk1.vmdk is a hdd disk file. Your file name can differ slightly. packer-virtualbox-iso-1459796137-disk1.vdi is new disk file that will be created in VDI format.

Now it's time to resize the disk image.
VBoxManage modifymedium /root/VirtualBox\ VMs/YOUR_VM_NAME/packer-virtualbox-iso-1459796137-disk1.vdi --resize 163840
0%...10%...20%...30%...40%...50%...60%...70%...80%...90%...100% 163840 is new disk size in MB.

Now you need to convert the disk image back to VMDK. 
REMEMBER: Use new name of file  
VBoxManage  clonehd "/root/VirtualBox VMs/YOUR_VM_NAME/packer-virtualbox-iso-1459796137-disk1.vdi" "/root/VirtualBox VMs/YOUR_VM_NAME/packer-virtualbox-iso-1459796137-disk2.vmdk" --format vmdk
Attach new storage and remove old one.
VBoxManage storageattach YOUR_VM_NAME --storagectl "IDE Controller" --device 0 --port 0 --type hdd --medium "/root/VirtualBox VMs/YOUR_VM_NAME/packer-virtualbox-iso-1459796137-disk2.vmdk"
rm "/root/VirtualBox VMs/YOUR_VM_NAME/packer-virtualbox-iso-1459796137-disk1.vmdk"
Now :
Run the VM (for example: `vagrant up`). In our case it is a Windows machine. That's why you need to go to the guest system and increase disk size there. Open Disk Management `diskmgmt.msc`. Right click on allocated partition and click Extend Volume.


  • Click right button
  • Choose an "Extend Volume.."
  • Click "Next"
  • Your disk is already extended


Be Sharp Software 


wtorek, 7 lutego 2017

Gradle dependecy scopes (for Java plugin)


  • archives - Configuration for archive artifacts.
  • compile - Dependencies for source set 'main'.
  • compileClasspath - Compile classpath for source set 'main'.
  • compileOnly - Compile dependencies for source set 'main'.
  • default - Configuration for default artifacts.
  • runtime - Runtime dependencies for source set 'main'.
  • testCompile - Dependencies for source set 'test'.
  • testCompileClasspath - Compile classpath for source set 'test'.
  • testCompileOnly - Compile dependencies for source set 'test'.
  • testRuntime - Runtime dependencies for source set 'test'.

poniedziałek, 6 lutego 2017

Restrict access to clipboard (copy/paste) in Remote Desktop (RDP) session

This settings need to be changed in Local Group Policy Editor.
Click Start, type gpedit.msc in the Start Search box, and then press ENTER

Change:
  • Computer Configuration\Administrative Templates\Windows Components\Remote Desktop Services\Remote Desktop Session Host\Device and Resource Redirection\Do not allow clipboard redirection

to Enabled

  • User Configuration\Administrative Templates\Windows Components\Remote Desktop Services\Remote Desktop Session Host\Device and Resource Redirection\Do not allow clipboard redirection 

to Enabled

Restart server

https://technet.microsoft.com/en-us/library/ee791794%28v=ws.10%29.aspx
https://technet.microsoft.com/en-us/library/cc731745(v=ws.11).aspx

piątek, 3 lutego 2017

JIRA 7.3.0 applications over SSL or HTTPS - connector fail

JIRA 7.3.0 applications over SSL/TLS - connector fail

If you use JIRA 7.3.0 (the newest ver.) you may have problem with running JIRA applications over SSL/TLS after creating self-signed certificates.
When you enter "https://localhost:<port number>" in your browser and see THIS


Cause may be JIRA configuration tool which in my case caused JIRA services shutdown. The tool modifies the server.xml setting protocol handler to Http11Protocol instead of Http11NioProtocol.


In order to fix the issue the solution below :

Logs/Catalina.out :
"SEVERE [main] org.apache.catalina.connector.Connector.<init> Protocol handler instantiation failed
 java.lang.ClassNotFoundException: org.apache.coyote.http11.Http11Protocol "
IT SHOULD LOOKS LIKE THIS: "..org.apache.coyote.http11.Http11NioProtocol"
You have to update changes manually in server.xml ----> /atlassian/jira/conf/server.xml

I hope it helps !
Be Sharp Software